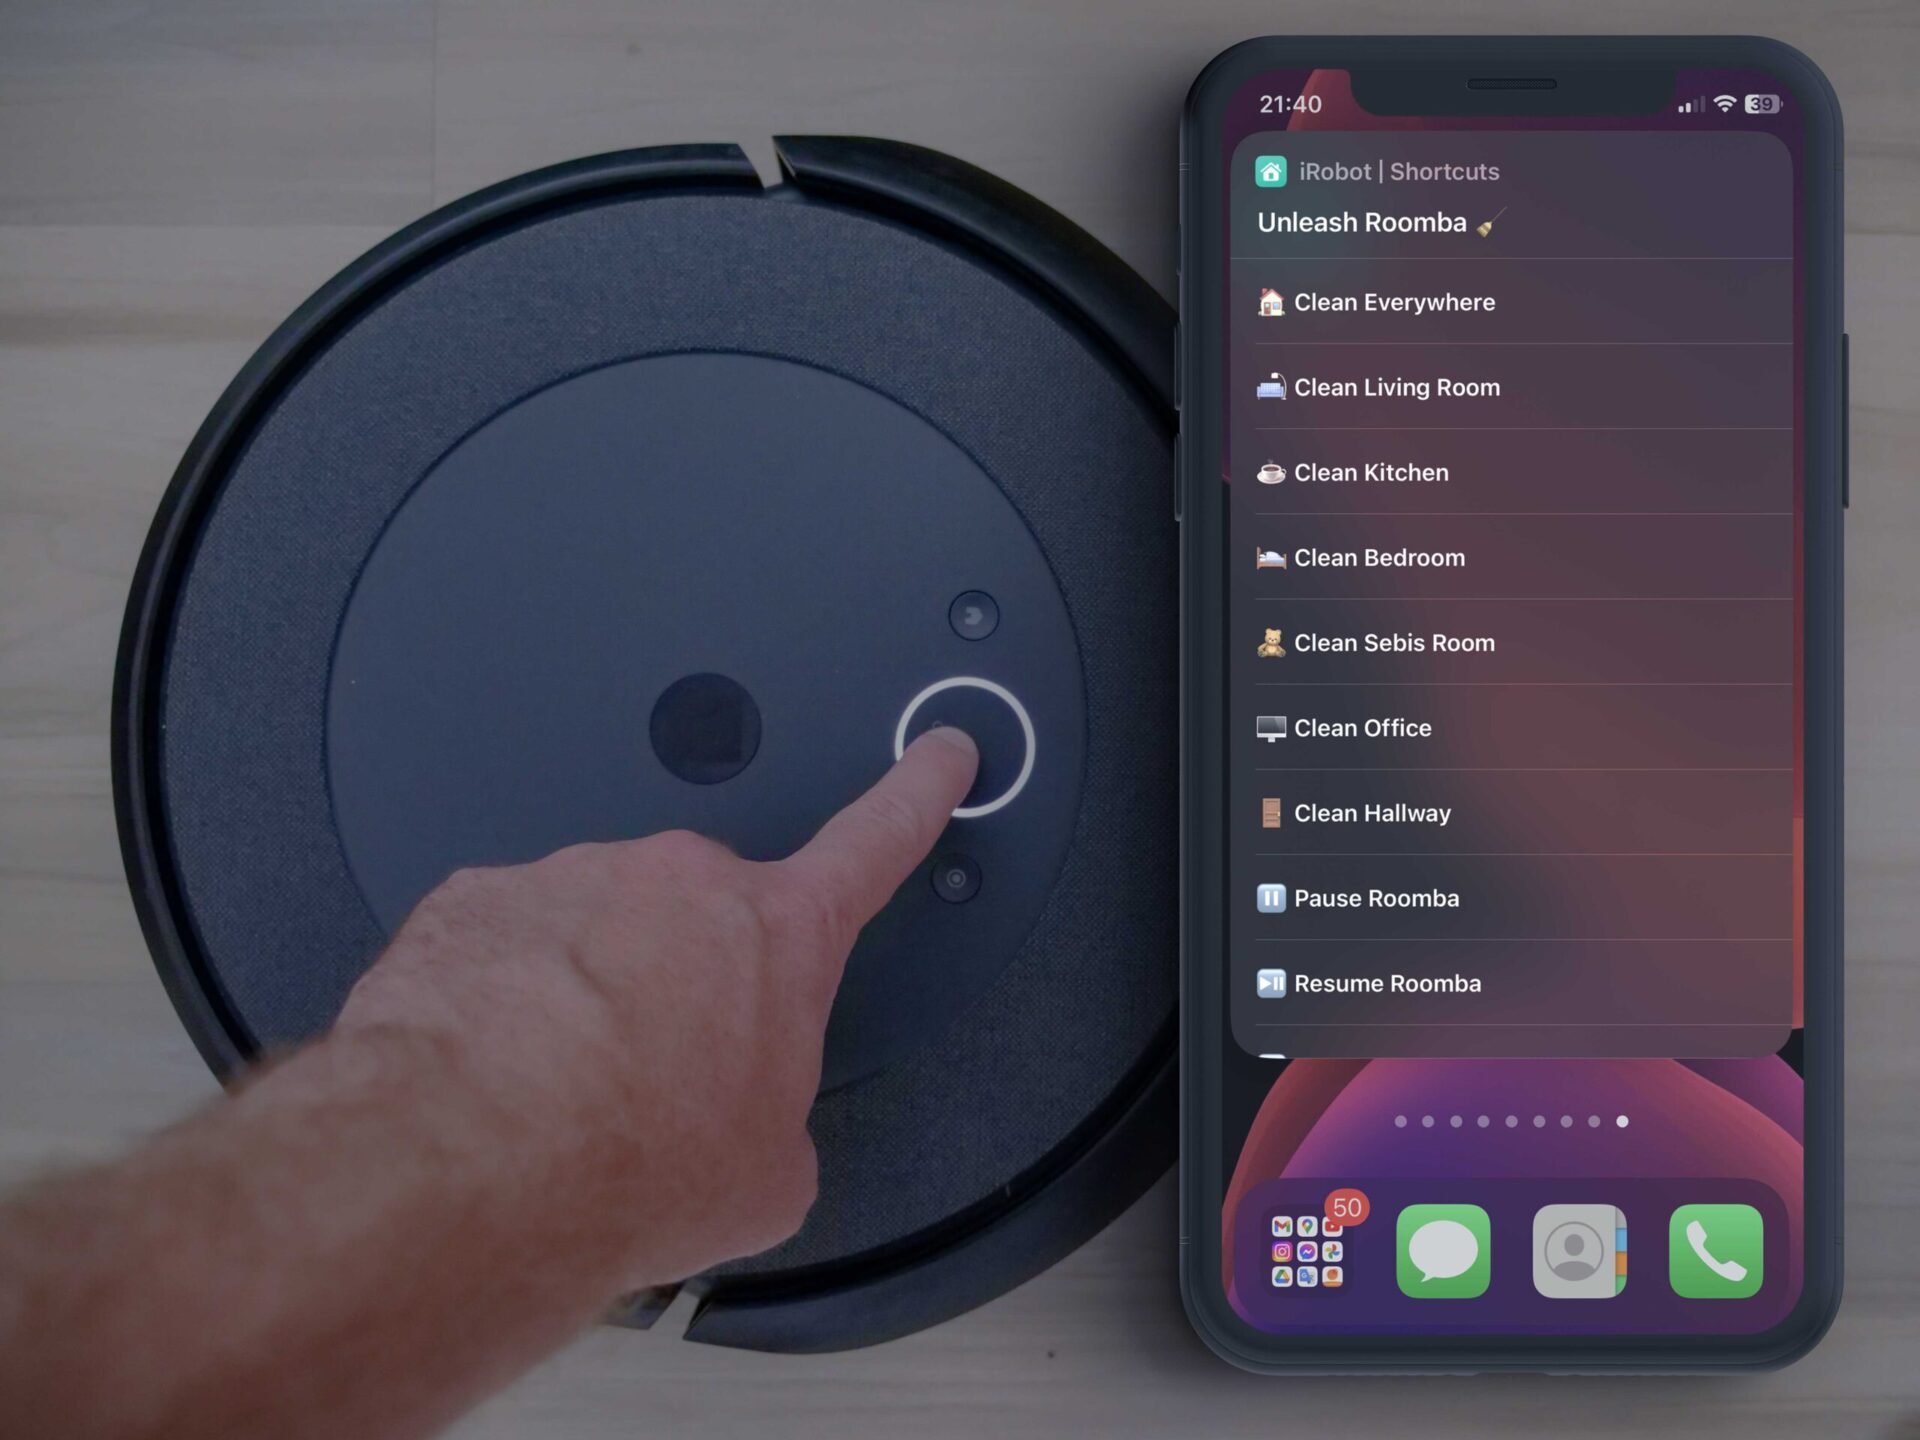
Robotic vacuum cleaners are becoming ever more popular. One of the most popular brands is iRobot and their Roomba robotic vacuums. Roomba can clean your home and save time, you may say. Having the robot clean your home while you are away is very convenient. Right? Well, if you have been a robotic vacuum cleaner owner for some time, you have probably realized that it is not always as easy and convenient as many might think. And now I’m not talking about cleaning. That part is great, well, most of the time. I’m talking about getting the robot to clean, as it’s not always simple or quick.
The controls…
So you got yourself a shiny new Roomba and can’t wait to use it. However, after the excitement disappears, you will realize that you only have two options to control your robot. Well, three, if you are old school and want to use the clean button.
You can use voice commands using Siri, for which support was only recently added, or the iRobot app.
For the most part, both options are great.
Use the iRobot app and select which rooms you want to clean or which clean zone you want. Need to clean only one room? The app can do that too. Do you want your robot to make two passes in the same room? Yes, the app can do that too.
Laying comfortably on the couch and your phone is not within reach, ask Siri. All is perfect. Almost.
The not-so-good…
But what if using Siri is not convenient for you at specific times? For example, when you are at work. Or you do not want to use the app simply because it takes ages to send Roomba to clean a room. Know what I mean?
You must open the app, wait for the app to connect, tap the new job button, select a specific room, and click start. There are too many taps when you only want to clean one room.
And at times, it can take a moment or two or three for the app to connect. And the worst part is that you have to wait for the app to connect before you are allowed to select the rooms to clean.
For some, using Siri is not convenient, and you will always use the app. And it just takes forever when you do it often.
The easy way …
What if there was a way to make all this easier and be just one or two taps away? Use the shortcuts app and create widgets that you can place on your home screen, right? NO. To have one widget taking up space of four app icons is not a solution. Besides, you can only clean one room with the shortcuts widget.
Use the other available widgets that the shortcuts app offers. Right? Well, again, no. You will have more options available, but it will take up even more space on your home screen. None of the options is good enough for me.
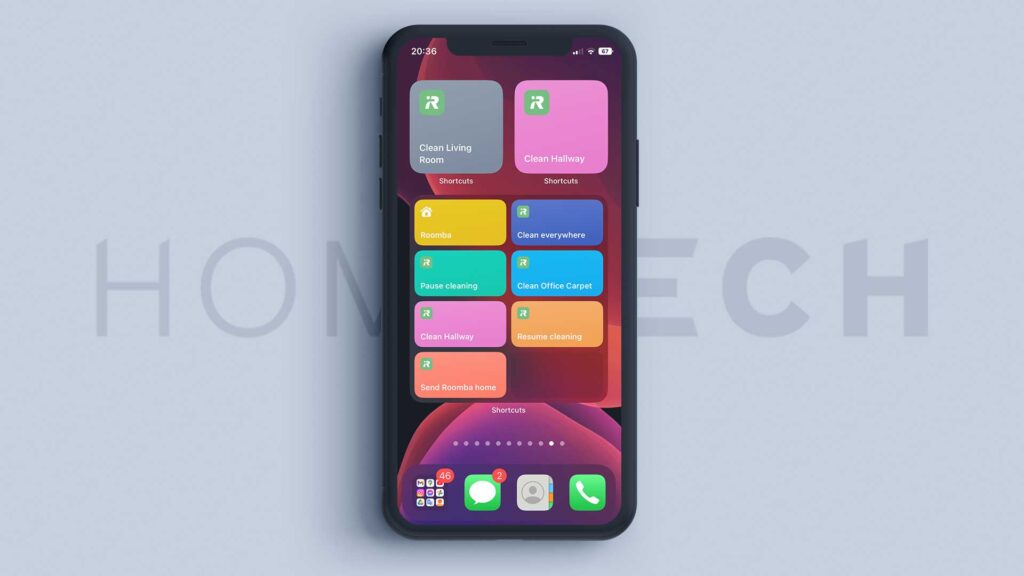
Well, good news because you can have all your cleaning options just two taps away. And the best part is the Shortcut will blend in with your other apps thanks to the Shortcuts app. It is a much faster method that only takes two taps. It is way more convenient when you can not talk to Siri for one reason or another. Or you do not want to wait for the app to connect to your robot.
I will show you step by step how you can set up a nifty Shortcut that allows you to choose which rooms you want to clean. The options we are about to create are fully customizable to fit your needs, so feel free to change them as you see fit.
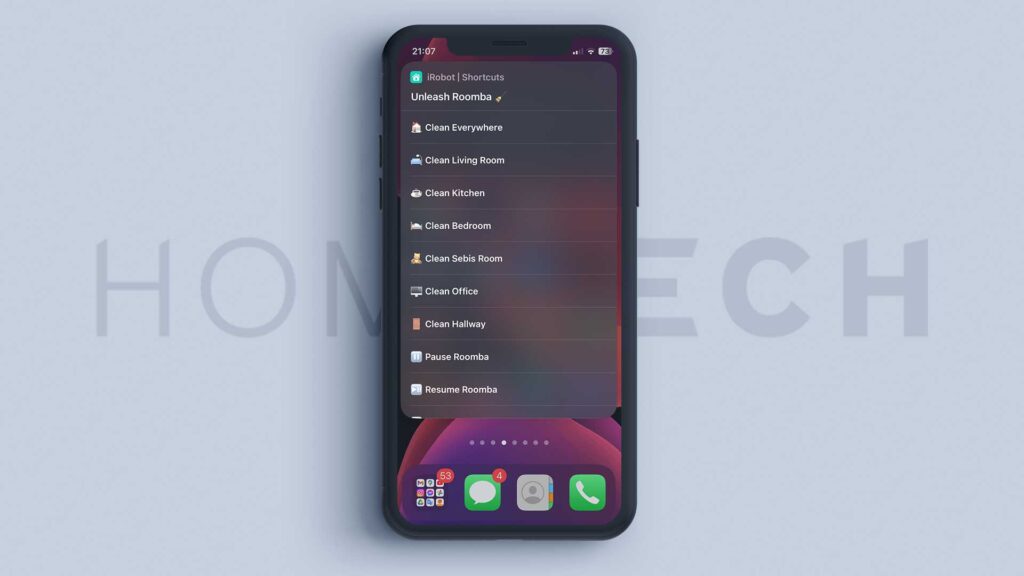
The iRobot app
You will need the iRobot and Shortcut apps to set up our cleaning Shortcut. You can download the Shortcuts app from the App Store if you do not have it. Also, this list was created using the Roomba S9+, so your robot should also support the smart imprint navigation map.
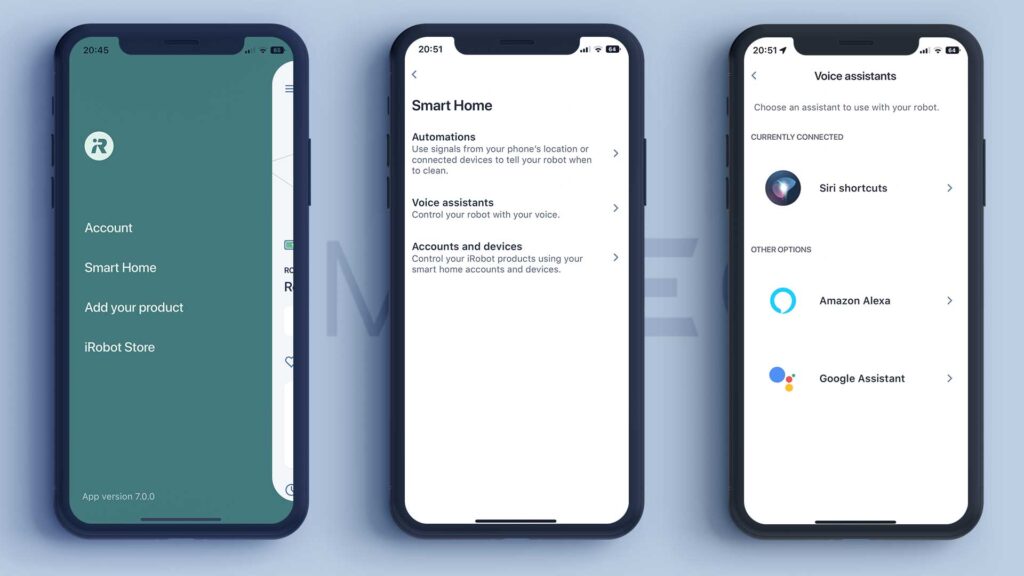
To make our list work, we first need to add our Siri Shortcuts through the iRobot app. To do that, open the iRobot app, tap on the Menu, select Smart Home, then Voice assistants and Siri shortcuts.
You will see a list of all the available actions you can add to Siri. The list is based on your home, so it may differ from what you see here, but the steps will be the same.
From the list, tap the plus button next to each action you want. If you like, you can customize the Hey Siri phrase on the next screen. This is the phrase you will use when you ask Siri to send Roomba to clean.
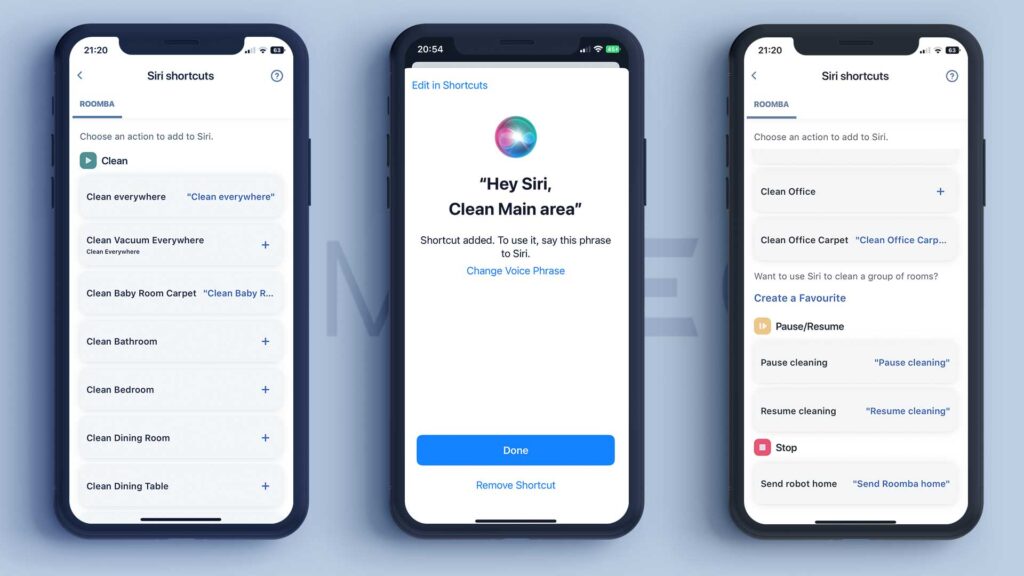
You can change it if you like or you can tap done.
When the Shortcut is added, you will see the plus button is replaced with the specific command.
Do this for all your rooms or the clean zones you want. You can even add the actions like pause or send the robot home.
You can do this for multiple rooms if you have saved your favourites and added Siri support.
Once you are happy with your selection, you can close the iRobot app, as we will no longer need it in this tutorial.
Creating the Shortcut
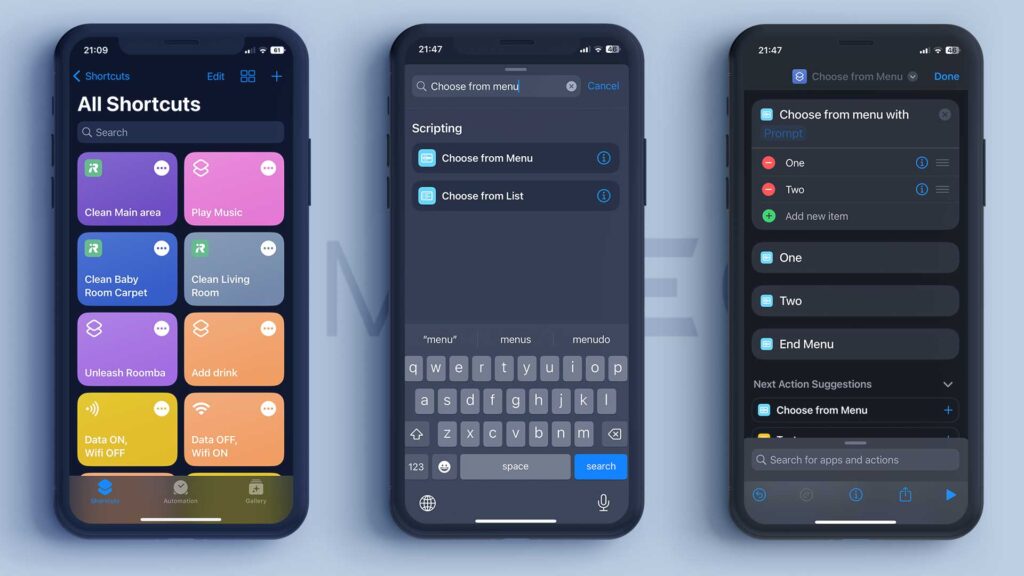
Now that you have added all the shortcuts you want to use, open the Shortcuts app, and we will start creating our list.
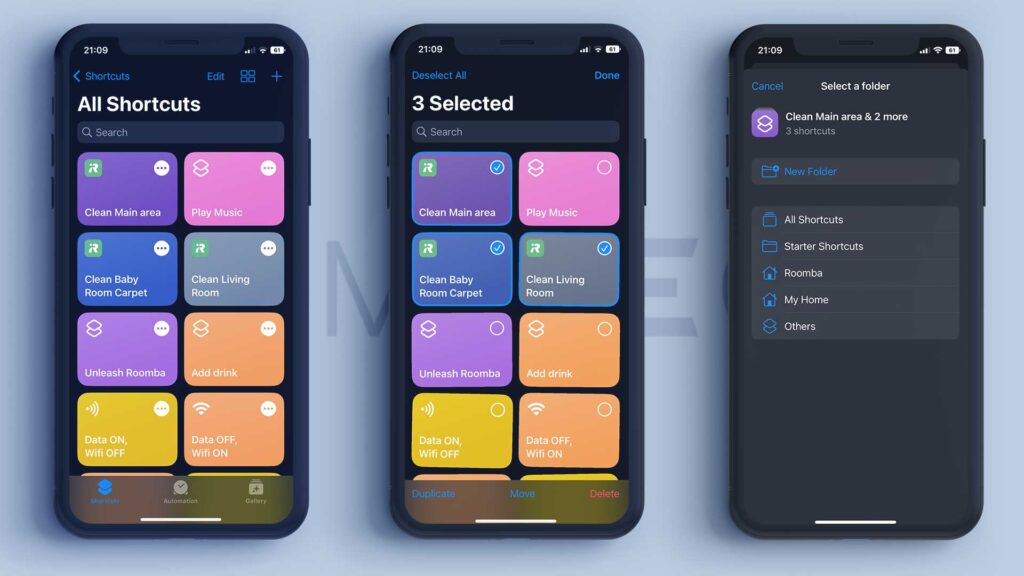
Now it’s an excellent time to organize the Shortcuts that were added. This is an optional step.
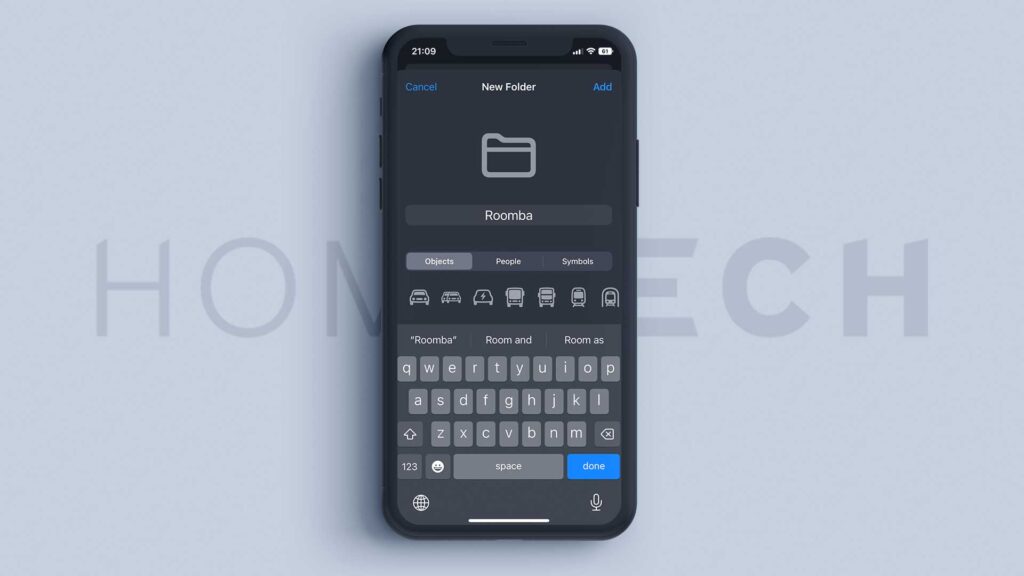
But if you want to have all your iRobot shortcuts, you just added all in one place, tap Edit and once the icons start to jiggle, select all the iRobot ones. Tap move at the bottom of your screen and tap a new folder. You can name it anything you want. I’ll call mine Roomba, select an icon for your folder, and tap Add in the top right corner.
With this done, we can start creating the Shortcut that we will use to control Roomba. Tap the plus button in the top right corner and tap Add Action.
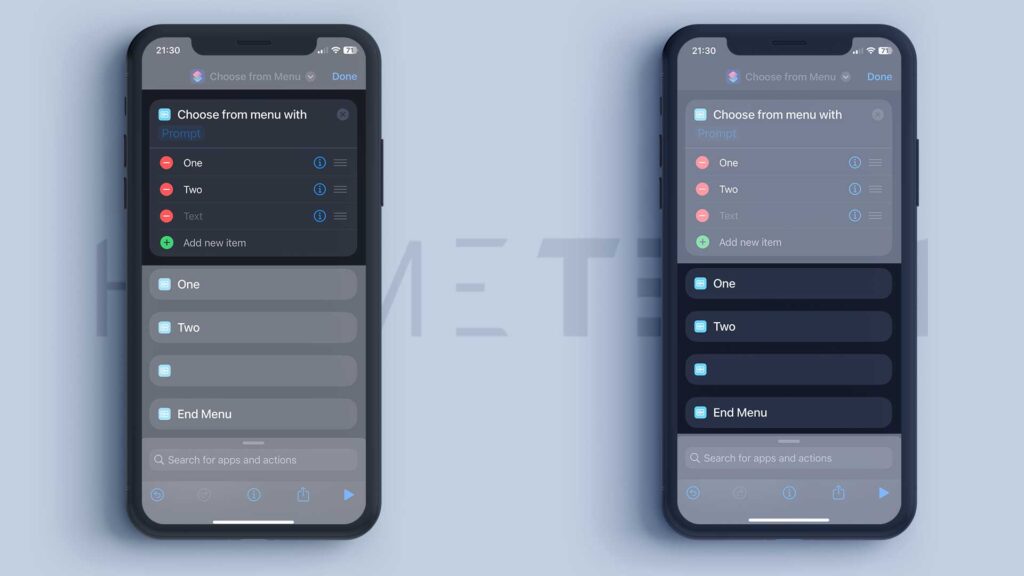
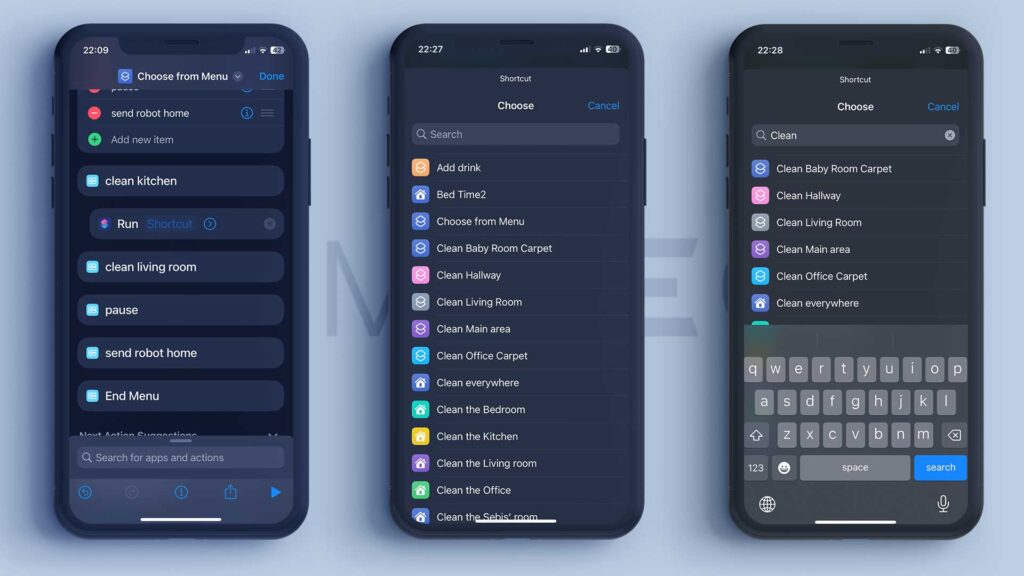
Now tap inside the search bar, search for Choose from Menu, and tap on the Choose from menu action. The Choose from Menu action will have two parts – the “Item list” and the “Action list.
The Item list will be the items on the list that will be shown on your screen. And the Action list is the automation triggered when you select an option from the list.
First, you will need to add a Prompt. You can name it anything you like. This will be the name of the list that will be shown to you when you run the Shortcut. I will call mine Unleash Roomba.
Next, I will rename the two list items. I will add the Clean Kitchen and a Clean Living room. To add more options to the list, tap the green plus Add new item and give it a name. You can add as many as you want. I will only add the most important ones to keep the list short to avoid a lot of scrolling later.
Now, if you have noticed, the action list part got updated with the corresponding names from the list items.
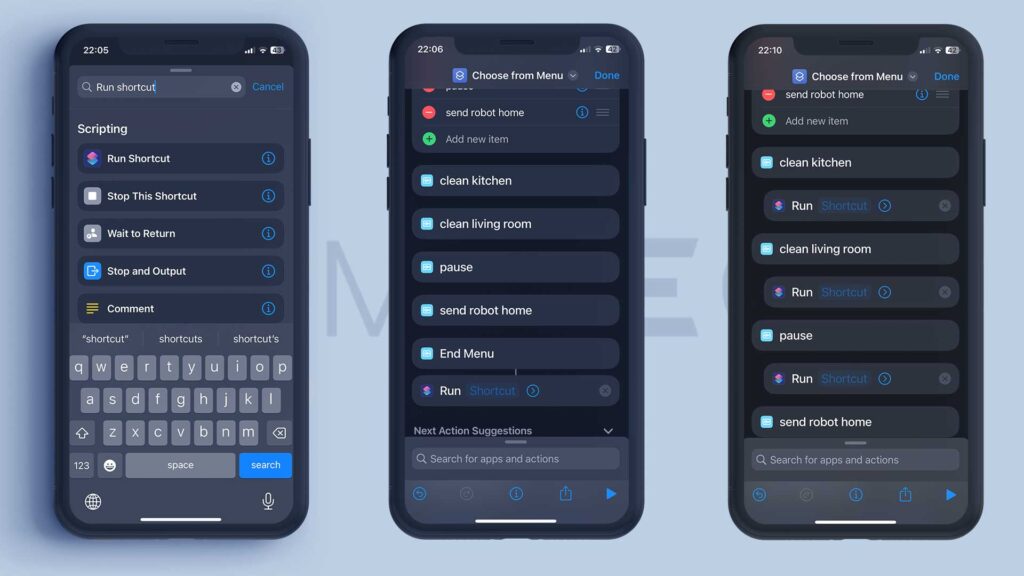
Now you have to add the actual action to each list item. To do this, tap the search bar at the bottom of your screen and type in Run Shortcut.
The action will be added at the end of your list after the End Menu item. To move it, tap and hold for a moment, and then move it under your first action. Now you need to repeat the steps for all your actions.
The Run Shortcut should be indented under each action item.
Now go back to the first Run Shortcut option and tap on the blue Shortcut option. You must tap the text and not the arrow. Now search for the iRobot shortcuts you created earlier once you have added the Shortcut to the first action. Repeat the steps and fill in your list. Once done, double-check to ensure that all the Actions are under the correct List items.
If you have added the Pause, Resume and Send Robot home options, the process of adding them is slightly different, as you will not need the Run Shortcut action.
Instead, you will search for the iRobot actions directly. Why was iRobot able to add these few but not the others? One can only wonder.
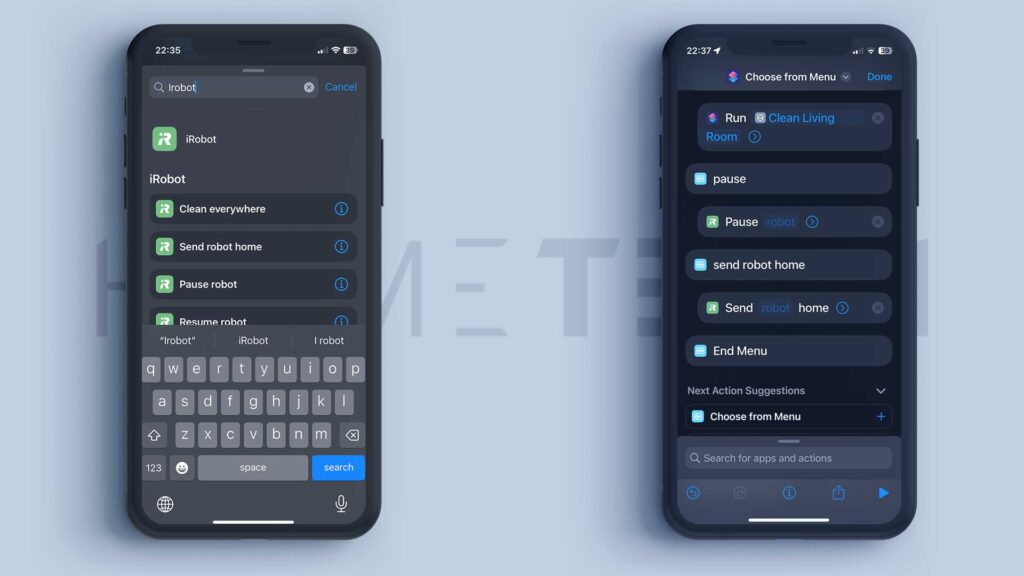
With this, completed the difficult part is done.
Almost there…
Once your list is complete, give your Shortcut a name. Tap on the down arrow in the top middle of your screen and select rename. This will be the name of the Shortcut you are creating and will be shown on the home screen. You can also choose a new icon and a new color.
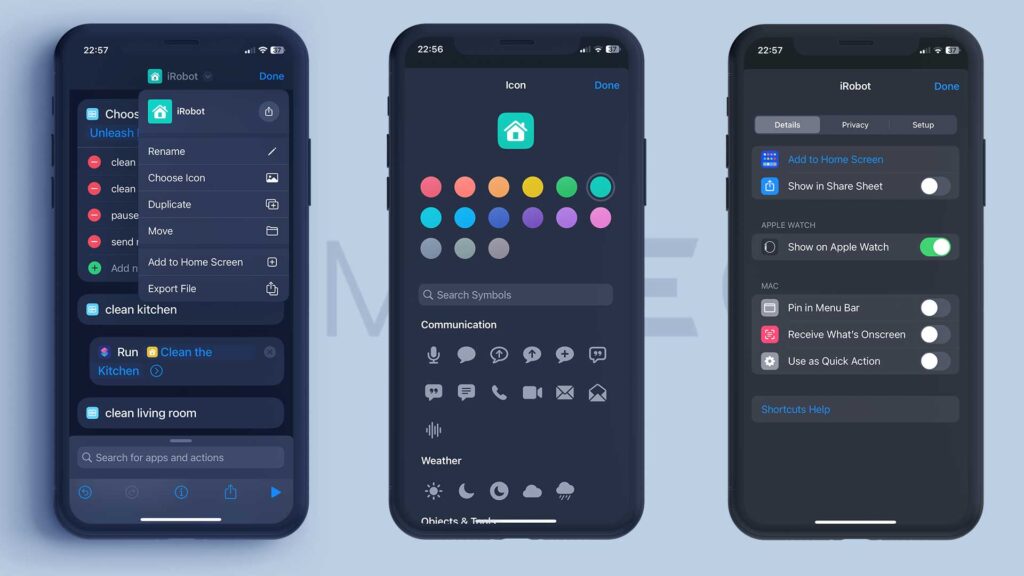
After this, there is a couple of options you can select. Tap the little i in the circle ⓘ at the bottom of your screen. If you have an apple watch, you can enable the Show on Apple Watch toggle. You can select the Pin in the Menu Bar toggle if you have a MAC. If you use the shortcuts directly from iRobot, tap the privacy tab and toggle the switch.
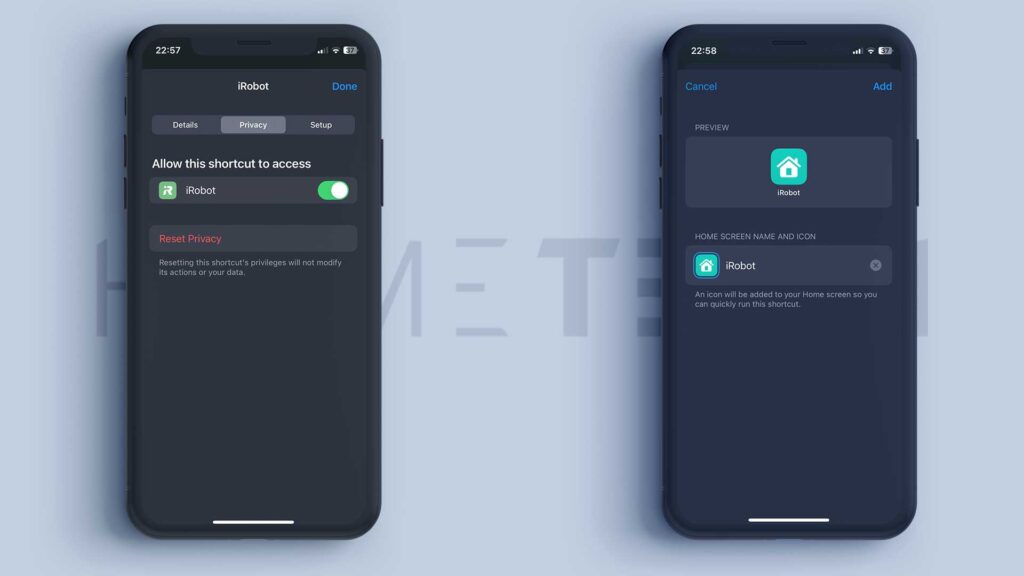
Finally, select the add to home screen option, change the name and icon if you like and tap Add. You will be taken to the home screen where the Shortcut was added.
Swipe on the bottom edge of your screen to get back to the Shortcuts app. Tap Done in the top right corner and then tap Done again. Now you close the Shortcuts app.
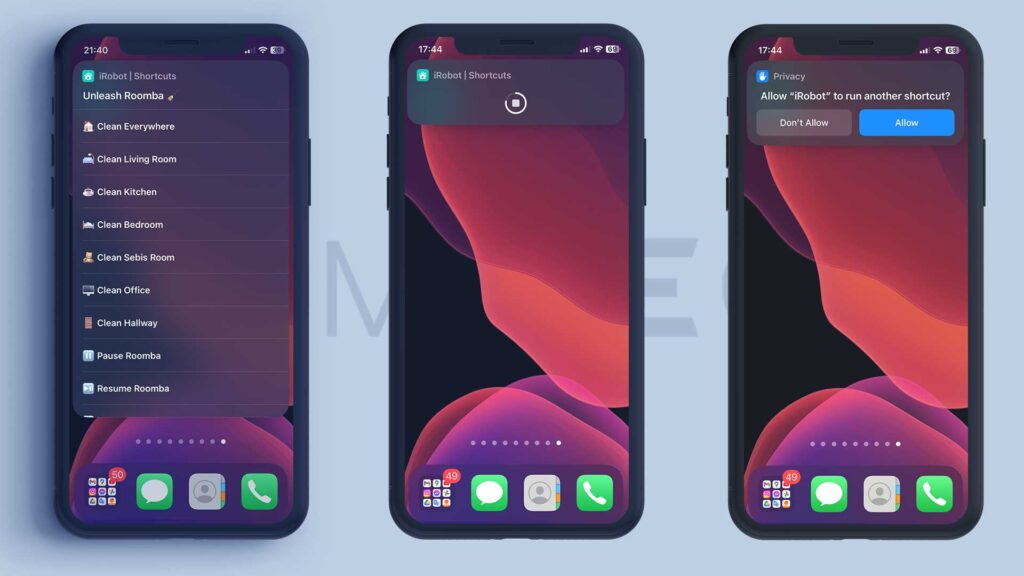
Congratulations your Shortcut is now ready, and you can test it out and send your Roomba to clean.
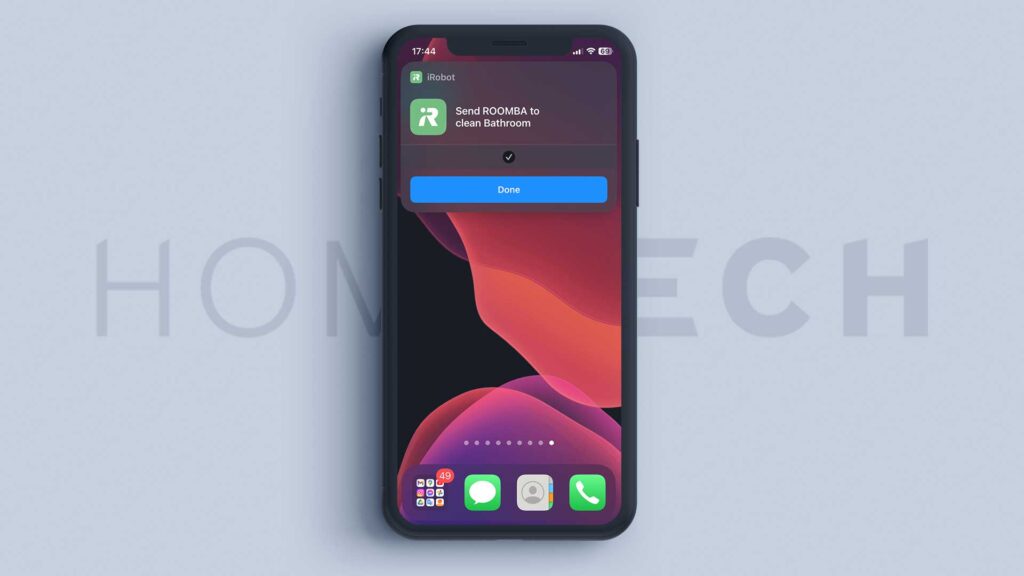
You will need to make one more step if you trigger any actions from the list for the first time. You will receive a Privacy notification asking if you want to allow “iRobot” to run another shortcut. Tap Allow. And you will receive another notification showing that the Shortcut has been triggered.
At this point, you have successfully built your Roomba cleaning list. You can easily send Roomba without opening the iRobot app or asking Siri.
If you have trouble with the app or Roomba does not clean the room you have selected, make sure you have added the correction actions under the correct list item.
You can also leave a comment on the blog post, and I will try to answer your question and help you out.
